Building a home squash court means hitting World Squash Federation (WSF) standards in your own space: a four-walled room at precise dimensions, with the right wall finish, flooring, lighting, and ventilation. Get those wrong and it plays badly or fails inspection, so what follows covers the specs, the materials, the real cost, and the build itself.
Squash Court Specifications (WSF Standards)
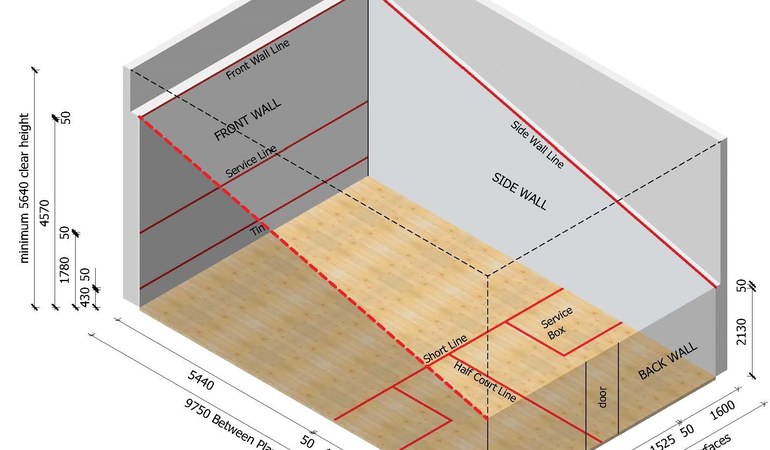
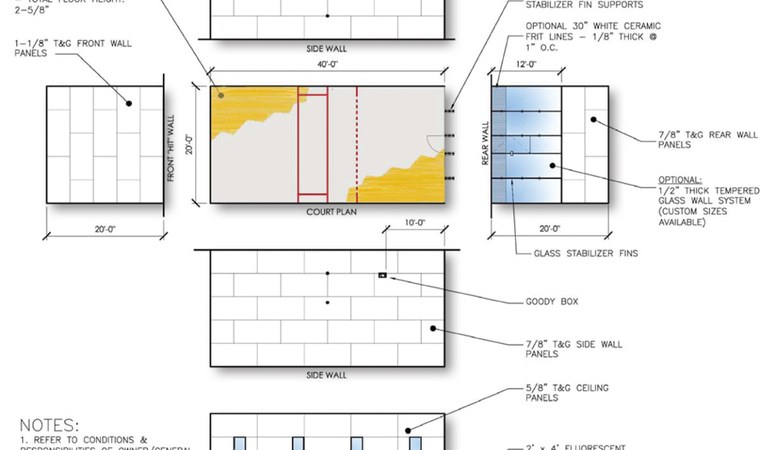
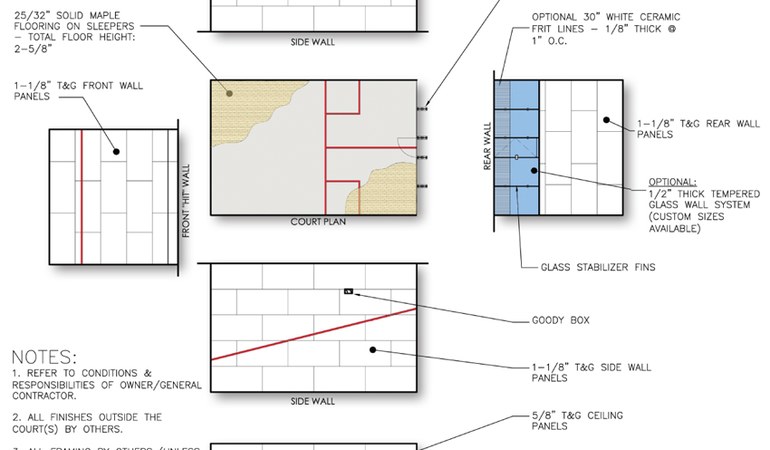
Dimensions and layout. A regulation singles court's internal dimensions are 9.75 m long by 6.4 m wide (about 32 ft by 21 ft). The height to the lower edge of the front-wall out-line is 4.57 m (15 ft), and to the back-wall out-line 2.13 m (7 ft). The front wall carries a service line at 1.83 m (6 ft) and a tin (board) at the bottom 48 cm (19 inches) high; the side-wall lines slope from 4.57 m at the front to 2.13 m at the back. The short line is marked on the floor 5.49 m from the front wall, and the two service boxes are each 1.6 m by 1.6 m (about 63 by 63 inches). All dimensions are measured to the finished interior surfaces, so account for wall thickness when building.
Wall surfaces. All four walls are playing surfaces and must be solid, flat, and hard with a smooth matte finish, giving an even rebound with no dead spots, cracks, or hollow sounds. Build from masonry coated with high-strength squash plaster (a resin-infused gypsum that resists chipping), from WSF-accredited high-density panel systems, or a combination; the back wall is often glass. Walls are painted white or a light color, with a minimum 50% reflectance per WSF guidelines, and the red lines should be 50 mm (2 inches) wide and contrasting.
Flooring. Squash floors are solid hardwood (typically maple or beech) on a cushioned sprung subfloor with rubber pads, firm for rebound yet slightly shock-absorbing. The surface is left unsealed with a lightly textured matte finish for grip, light in color, with painted lines for the half-court line and service boxes. Pre-engineered systems exist, for example WSF-accredited Junckers SylvaSquash boards. Synthetic flooring is rare but must meet the WSF rebound and safety criteria.
Ceiling height and lighting. The minimum clear height is 5.64 m (18.5 ft) across the whole court, measured to the lowest obstruction including lights; nothing may hang below this, and many courts are open to the roof trusses. Lighting must be artificial and even, with a WSF-recommended average of 500 lux at floor level and a minimum of 300 lux uniformly; LED panels or high-bays with diffusers work well, positioned so they do not blind players or protrude into the clear space. Interior surfaces should be matte white to contrast with the dark ball.
Ventilation and climate. The WSF specifies at least four fresh-air changes per hour in use; plan an HVAC supply and return or an exhaust fan. Aim for about 20-24°C (68-75°F), in line with WSF guidance of around 22°C, since cooler air makes the ball less bouncy. Add acoustic dampers in ductwork if soundproofing conflicts with airflow, and use a dehumidifier or insulation in humid climates, since condensation makes walls slippery.
Materials and Construction Breakdown
Each component needs specialized materials.
Walls (front and sides). Common approaches:
- Masonry plus plaster: concrete block or brick with a hard squash plaster such as Armourcoat Squash Plaster (resin-reinforced gypsum), applied about 12 mm thick over a base coat and finished smooth and matte. Durable, but plaster can crack or spall if poorly done; a quality WSF-approved plaster and professional application minimize this, and it can be re-plastered when needed.
- Panel system: prefabricated high-density panels on a framework, often sand-filled boards on a steel frame, or engineered wood or fiber panels (such as WSF-accredited Fiberesin), pre-finished matte white. Faster to install with reliable bounce; downsides are cost and the need for a perfectly flat support. Top systems from suppliers such as ASB, CourtTech, and Fiberesin use continuous surfaces to avoid hollow sounds.
- Hybrid: plywood or MDF on studs is a budget option but will not match the durability or bounce of proper panels or plaster.
All wall surfaces must be flush with no protrusions, even at joints or corners; corners are square (90 degrees) and plumb, checked with a laser level. Plan the wall finish to meet the floor with no gap at the bottom.
Floor. A sprung sports-flooring system:
- Top surface of solid hardwood boards (about 18-22 mm thick, often 7/8-inch strips), tongue-and-groove, nailed or screwed to a sub-frame; maple in North America, beech or ash in Europe.
- Substructure of sleepers (joists) or an interlocking panel undercarriage with rubber pads (for example Junckers clip or batten systems), or 2x3/2x4 joists on rubber pads at spec spacing.
- A vapor barrier between the slab and wood, important at ground level or in basements.
- A sanded matte finish (light oil or seal, no glossy polyurethane); game lines painted or taped.
Alternate floors: some multi-sport courts use rubberized or acrylic surfaces, which sacrifice some bounce; ensure any such floor is accredited or gives a consistent bounce.
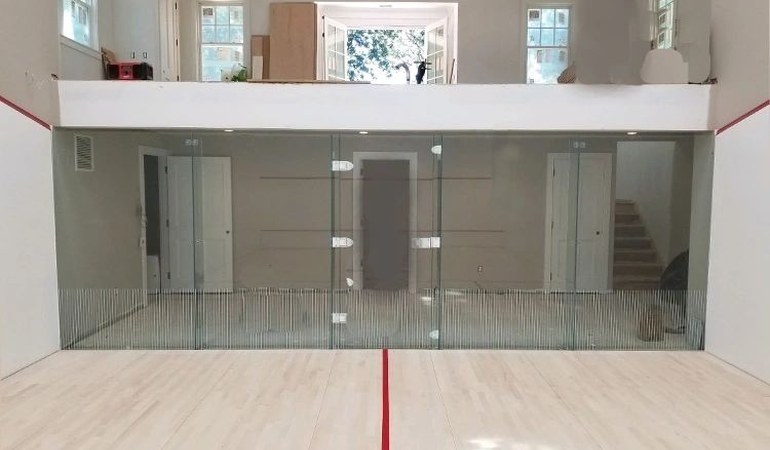
Back wall and door. The back wall can be solid or glass. The modern standard is a glass wall of 12 mm tempered glass panels with aluminum or steel posts (or a frameless fin system), usually two or three panels with a central door; it is tempered and sometimes laminated for safety, with a fine etch or dot pattern. The glass door is mounted on special hinges, often with a spring closer, and all glass should meet safety standards (often BS6206 or ASTM C1048). A cheaper solid back wall (plaster or panels) uses a flush solid-core or laminate door painted to match, with no protruding handles inside. Mark the WSF back-wall out-line at 2.13 m. A squash door is about 2.1 m tall by 0.75-0.9 m wide, opens outward (never into the court), is self-closing, and sits flush with the floor.
Ceiling and lighting fixtures. Any ceiling should be at least 5.64 m (18.5 ft), drywall or open to the roof, matte white and free of protrusions. Recess lights flush or mount them high to the sides; with a 20-foot ceiling you might hang LED panels at 18 feet on the side edges. Deliver 300-500 lux uniformly, typically with four to six LED troffers or high-bays. LED avoids flicker and heat; cage or recess fixtures so a ball cannot hit a bulb. Cover any skylights or windows with blinds in use, since the WSF does not allow glare.
Miscellaneous components.
- The tin: a panel on the lower front wall that sounds when struck, optional at home. A squash tin is usually an 18-inch-high sheet-metal panel from the floor to the 48 cm tin line, projecting no more than a few millimeters (often flush), sometimes with foam behind for sound. Alternatively, paint the lower 19 inches a different color.
- Fixings and trim: use flush hardware; place outlets, switches, and grilles below the 0.48 m tin line or above the 5.64 m line. Install any AC vent just above floor level or at the top of the wall with a flat chamfered grille, and pad or bevel unavoidable protrusions.
Materials List Summary
- Wall surfaces: high-strength squash plaster (such as Armourcoat), prefabricated panels (such as Fiberesin or ASB), and masonry with a bonding agent if plastering; rigid, smooth, matte, light or white, WSF-approved where possible.
- Flooring: hardwood boards (maple or beech), a sleeper subfloor with rubber pads or a prefab undercarriage, a vapor barrier, and an oil or wax finish (no glossy poly). Order roughly 700 sq ft of hardwood for cuts; mark lines with durable paint or tape.
- Back wall and door: 12 mm tempered glass panels with hardware and a glass door with closer and latch, or matching plaster/panels plus a flush solid-core door; frame a door opening about 7 ft by 30-36 in; keep interior surfaces flush.
- Ceiling: drywall or plywood if enclosing, optional acoustic insulation above, and matte white paint; out of play if above 18.5 ft, otherwise mark an out line.
- Lighting: high-output LED (4000-6500 K), mounting hardware, and code wiring; roughly six to eight lights of about 100 W LED equivalent each for around 500 lux; switches outside the court, none directly above the front wall.
- Ventilation: a quiet exhaust fan, a fresh-air intake or door grille, and optional HVAC ductwork, for at least four air exchanges per hour; a high vent on one side and a low vent on the other aids passive airflow.
- Court lines and tin: 50 mm wide red tape or paint, a metal tin panel (17-19 inches high), and floor paint for the service boxes; place lines with a laser level (front wall 15 ft and 6 ft, back wall 7 ft, side-wall connectors).
Required Tools and Equipment
Standard tools plus a few specialized ones:
- Measuring and layout: a laser level or long spirit level, tape measures (at least 10 m), chalk lines, and a laser distance measurer to verify the 9.75 m length and 6.4 m width.
- Power tools: a heavy-duty drill (masonry bits for concrete) and driver, a circular or miter saw, possibly a rotary hammer for anchoring frames, a mortar mixer for plaster, and an angle grinder for cutting metal or the tin.
- Scaffolding and ladders: a mobile scaffold tower or at least a 12-15 ft A-frame ladder for high walls and the ceiling.
- Plastering tools: a hawk board, trowels, a darby or straightedge, mixing buckets, and floats; consider hiring a professional for the finish coat, since the wall finish is crucial.
- Flooring tools: a pneumatic floor nailer (or screws per board), a pry or pull bar, spacers, a mallet, and a drum or orbital sander if sanding after install.
- Glass installation: suction-cup lifters, scaffolding, a torque wrench or the kit's fasteners, glass-handling gloves, and two or three strong helpers, since panels can weigh 200 lbs or more each.
- General and finishing: hammers, saw horses, screwdrivers, utility knives, a caulking gun, brushes and rollers, a shop vacuum, painter's tape, and safety gear.
DIY vs Contractor: Cost Estimates

The table compares a DIY approach (materials only, assuming your own labor) with professional installation. These are broad approximate ranges in US dollars, varying widely by location, material quality, and site conditions.
| Component | DIY (materials only) | Professionally installed |
|---|---|---|
| Wall system (front and side walls) | About $5,000-$10,000 for cement blocks, plaster, or basic panels; a high-end panel system kit $15,000 or more | About $15,000-$30,000 including labor for plaster or panels; high-end panel systems fully installed reaching around $40,000 |
| Flooring (wood plus subfloor) | About $4,000-$7,000 for maple or beech boards, pads, and fasteners | About $8,000-$15,000 for material and install; specialist installers may charge around $12-$20 per sq ft |
| Back wall and door | About $3,000-$6,000 for a glass wall (panels, door, hardware), or $1,000-$2,000 for a solid wall with a basic door | About $6,000-$10,000 for a glass wall by a specialist; a solid wall is cheaper and often included in the wall cost |
| Lighting and electrical | About $500-$1,200 for LED fixtures, wiring, and switches, assuming existing service nearby | About $1,500-$3,000 for electrician labor and fixtures, more if new circuits are needed from a distant panel |
| HVAC and ventilation | About $300-$800 for a wall fan or duct materials, or near zero if using existing HVAC | About $1,000-$5,000 for a pro to add ducts and returns; a simple exhaust fan is inexpensive, central AC or a mini-split raises the cost |
| Painting and lines | About $200-$500 for court line tape or paint, wall paint, and a tin panel | About $500-$1,000 to hire a painter, though this is often done DIY even in contractor builds |
| Ancillary (permits, design) | Perhaps $500 for plans and $500 for permits if required, with your own time not billed | About $1,000-$3,000 for drawings, engineering, and permits, which a contractor might include |
Total estimates. A full DIY material cost commonly runs from about $15,000 at the bare minimum to $40,000 or more. A turnkey, professionally built court commonly runs from about $50,000 to $100,000 or more, with high-end custom courts reaching around $120,000.
Notes on costs. These assume you already have a correctly sized empty room. Building an addition or external structure to house the court (foundation, roof) adds roughly $20,000-$50,000. The court installation alone is often quoted in the $40,000-$60,000 range for basic setups. One home-court builder reported about $35,000 total, roughly $18,000 for wall materials, $8,500 for the glass back wall, and $8,500 for the flooring. Turnkey packages from companies such as ASB and CourtTech run higher but include warranties and faster installation.
DIY considerations. The most expensive items, prefab wall kits and glass, do not drop much with DIY, so savings come mainly from doing the labor-intensive parts (walls, floor) yourself. Mistakes can be costly (a poorly plastered wall or a moisture-buckled floor), so a common hybrid is to act as general contractor, hiring subcontractors for plastering and flooring while doing painting and lights yourself. Hire contractors experienced in sports floors, who understand the tight tolerances; many manufacturers sell materials or kits to DIY builders.
Construction Process and Timeline
The build typically proceeds through these phases.
- Planning and design (one to two months). Confirm the space fits the internal dimensions plus wall thickness, create scale drawings or hire an architect or engineer, choose the construction method (plaster or panels, glass or solid back wall), get material quotes, and check building permits (garage or basement conversions and electrical work usually need one). Reinforce the structure and clear the 21 by 32 ft open span (a basement support column needs a steel beam, so engage an engineer), and plan for the 18.5 ft height. Order long-lead items, since flooring or glass systems take weeks to make.
- Site preparation (one to three weeks). Demolish old finishes, clear down to the concrete slab, and level it (within 3-4 mm across the court). Rough in electrical and HVAC before the walls and floor go in, keeping vents below the front-wall tin line or above court height; anchor any panel-system frame to slab and ceiling, or put up stud framing for plaster.
Wall construction (two to four weeks).
- Plaster walls: over cured block, apply a scratch coat then a finish coat of squash plaster, steel-troweled flat and smooth; allow one to two weeks curing (well ventilated, not too rapid) before sanding and finishing, to prevent cracks.
- Panel walls: install the aligned, square metal frame (floor tracks, posts, top tracks), then mount the panels (often 100 kg or more each) per the manufacturer's sequence, sealing or skimming the joints; a crew can install all walls in a week or less.
- Glass back wall: usually installed after the other walls but before the floor, anchoring the frame or shoes into the slab, then lifting in the panels with precise alignment; often handled by a specialist, done in a day or two.
After the walls, mark the regulation wall lines (pencil and snap chalk lines as guides).
Floor installation (about one week). Lay the rubber pads or sleeper grid, the plywood subfloor if used, then the hardwood, leaving the perimeter expansion gap (about 3/4 inch). Boards run lengthwise along the court. Screen-sand for uniform texture, then add the 2-inch-wide red half-court and service-box lines in polyurethane paint or vinyl tape.
Finishing touches (a few days).
- Mount the tin with its top exactly 48 cm from the floor.
- Install the door hardware so the door self-closes flush with no gap a ball could pass through.
- Install flush ventilation grilles, switch plates, and light covers, painted white or clear.
- Clean the court thoroughly, including the glass.
Let the wood acclimate and the plaster fully dry, ideally about a week, before heavy play.
Timeline estimate. A professional crew can finish a single court in about four to six weeks once the space is ready (panelized courts sometimes under a month). DIY or self-managed builds take two to three months; allow buffer time and permit inspections, so expect roughly 8 to 12 weeks of activity spread over a few months.
Challenges and Tips
Space constraints. Stick to the standard dimensions, since even small deviations change play quality. If you must compromise (for example a 16-foot ceiling), the court will not be tournament-standard but can still be a fun practice court. Account for wall thickness, and leave a couple of feet of access around the court for construction and maintenance.
Structural considerations. Walls and floor take repeated impact, so reinforce stud framing against vibration. An upper-floor court needs the joists checked for the load; basements and garages on a flat, level concrete slab (within a few millimeters) with a vapor barrier are ideal.
Soundproofing. Squash is loud, so if the court shares walls with living spaces:
- Insulate wall cavities and consider double-layer drywall or resilient channel on the outside.
- Masonry blocks much of the sound; add an air gap and insulation behind any exterior framing.
- Fill or insulate gaps behind panels to prevent drum-like resonance (some panels are sand-filled).
- Seal the door (a tight glass seal, or an acoustic sweep or gasket on wood).
- Insulate the ceiling or roof if there are bedrooms above.
- For extreme cases, a room-within-a-room on rubber mounts is the ultimate but complex solution.
Ventilation and heat. A closed court gets very hot, so add a dehumidifier or AC connection in basements, and design airflow with a low vent on one side and a high vent on the opposite side. Avoid HVAC drafts that affect the ball's trajectory; diffusers help spread the airflow.
Floor maintenance and environment. Keep the court climate-controlled at a constant moderate humidity, ideally 40-50%, to prevent the boards shrinking or buckling. Enforce a clean-shoes rule, and re-sand or reseal the floor every 5-10 years in home use.
Wall maintenance. Keep some plaster mix for patching nicks and ball marks, and periodically repaint plaster walls with breathable matte squash-court paint to keep them bright. Panels usually just need cleaning, with a damaged section replaced.
Expert help. Bring in professionals for critical stages: structural changes such as removing a beam, plastering, flooring (tuning the bounce via pad firmness), and glass installation for safety. Project-manage and do the simpler labor yourself to save money.
Making the Space Multipurpose
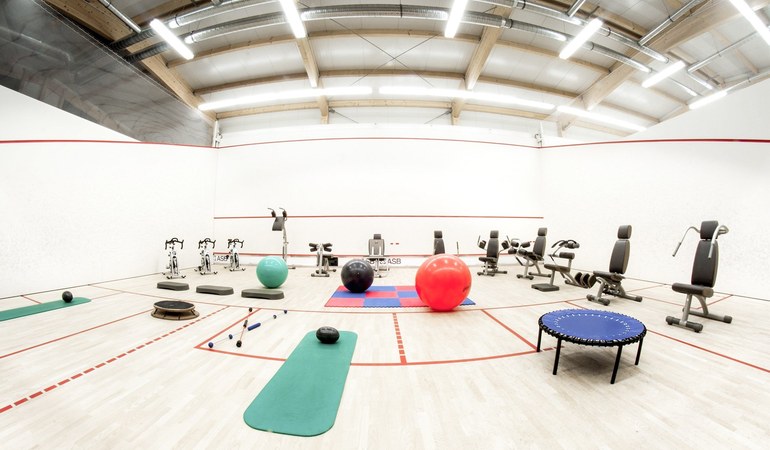
A home court can double as a recreation or fitness space when not used for squash.
- Home gym or fitness studio: the open 32 by 21 ft hardwood floor suits workouts, dance, yoga, or a gym; protect it from heavy equipment with rubber mats or plywood, and the high ceilings suit rope-jumping or plyometrics.
- Half-court games: mount a fold-away or removable basketball hoop on the front wall, or play wallyball, racquetball, or handball by ignoring the squash-specific lines.
- Entertainment or events: project movies onto the white front wall from outside, or use the court as a dance floor or table-tennis area; consider flush floor sockets or wall hooks for equipment.
- Equipment storage: a slim closet or rack just outside the court, or a rolling cabinet moved out when playing.
- Movable or foldable walls: higher-end designs can open a side wall into an adjacent room, needing structural support and locking mechanisms so it stays solid for squash.
Protect the walls and floor when using the court for other activities, and never permanently mount anything on the playing walls (a TV would not survive the first squash ball); use the outside of the court for speakers or a screen.
Trusted Suppliers for Squash Materials

Source materials from trusted manufacturers experienced in the sport, all with products used in professional courts.
Wall systems and panels
- ASB Squash Courts (Germany), a WSF-approved supplier of complete court kits, including patented glass walls and high-density panels.
- CourtTech (Germany and USA), WSF-accredited, with steel-frame sand-filled panel systems, long warranties, and home-court kits.
- Fiberesin (USA), a WSF-certified laminate panel system for squash and racquetball, ordered to size.
- For plaster, Armourcoat Squash Plaster (UK) or similar WSF-approved products, applied by an installer or a guided local plasterer.
Flooring
- Junckers (Denmark), whose SylvaSquash hardwood boards are WSF-approved and supplied as complete wood-plus-sleeper systems used in many tournaments.
- HARO (Germany) and Connor Sports (USA) make high-quality gym floors adaptable for squash with an unsealed finish.
- Court builders like ASB or CourtTech often supply wood flooring within their packages, some with proprietary engineered wood for more elasticity.
Glass walls and doors
- Ellis Pearson / Trent Glass (UK) and McWil (USA) provide squash glass walls; use certified tempered glass with proper mounting, WSF-certified for safety, typically including the door and hardware.
- ASB and CourtTech also sell glass walls separately (ASB has a popular four-panel system); follow the leveling and alignment instructions precisely.
Miscellaneous accessories
- The tin: from squash equipment suppliers (ASB makes tin plates) or a local metal shop, about 48 cm high, powder-coated, with foam backing for a resonant sound.
- Line tape and paint: 3M floor tapes, or polyurethane gym-floor paints that bond with wood; on plaster, self-adhesive tape in the correct 50 mm width is often better than paint, which can bleed.
- Lighting: commercial LED fixtures from brands such as Lithonia or Philips with glare control, a color rendering index of CRI 80 or higher, and a consistent daylight white of around 5000 K.
Many manufacturers (Fiberesin, Junckers, ASB, CourtTech) offer free advice, installation manuals, or design assistance. Following WSF specifications and using proven, certified products for walls and floors yields a professional-standard home court, ready for practice or competitive games and versatile enough for other uses.