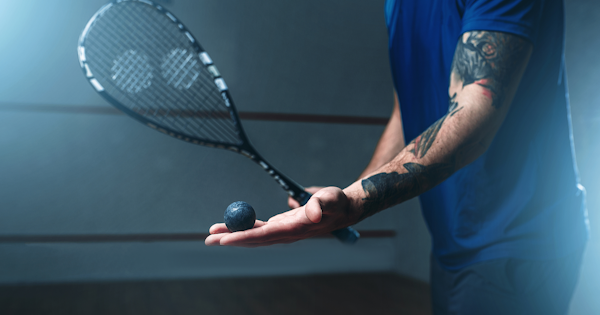
Why Restringing Matters in Squash
Fresh strings can have a real effect on your squash game. The strings are often called the "engine" of the racquet, and as much as 50% of its performance comes from the stringbed.
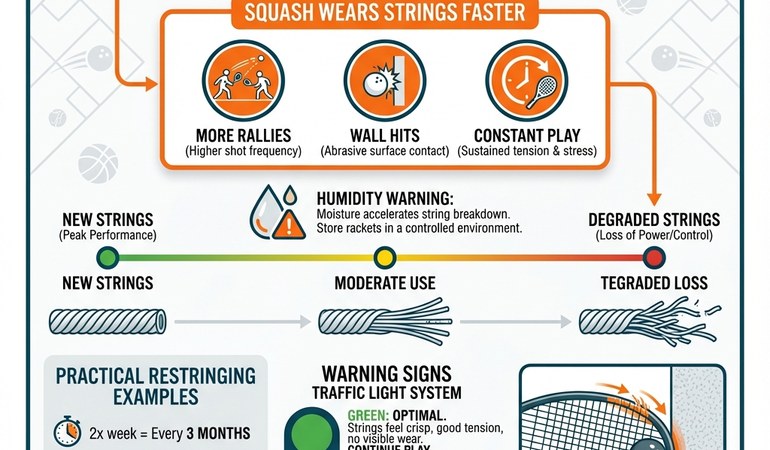
Over time, strings lose tension and elasticity, which leads to reduced power and inconsistent control. A loose, worn stringbed makes it harder to place shots accurately and diminishes the "bite" on the ball. Older strings are also prone to sudden breakage, sometimes at the worst possible time in a match.
By restringing regularly, you keep the racquet performing with a crisp, lively response on every shot. That helps your power, improves ball control, and maintains the intended feel of the racquet.
Durability is another factor, since all strings eventually wear out or snap. Thinner gauges, which are common in squash for more feel, tend to break faster, whereas thicker strings last longer but can feel dead or stiff over time. Even if you do not break a string, material fatigue means you should still restring periodically.
A common rule of thumb for squash players is to restring as many times per year as you play per week. For example, playing 3 times a week means at least 3 restrings a year to keep performance consistent.
Regular restringing protects your frame too, since an even distribution of fresh tension is better than playing with a very loose or one-sided broken string. Restringing preserves the racquet's playability, giving you a good blend of power and control and preventing the dip in performance that comes with aging strings.
Essential Tools for Restringing a Squash Racquet
To start stringing your own squash racquets, you need several key tools. Here is an overview of the essential restringing equipment with some beginner-friendly product recommendations for each.
Stringing Machine
The centerpiece of your setup, a stringing machine provides the tensioning mechanism and mounts the racquet securely. Entry-level options include affordable drop-weight machines like the Gamma X-2 or the Klippermate. These use a weighted bar to tension strings and a simple 2-point mounting system.
Despite their basic design, they are accurate to within about 1 lb of tension and handle squash tensions easily. The Klippermate is often recommended as a good machine for beginners that does a solid string job, and it comes with a lifetime guarantee. The Gamma X-2 is another popular choice, with a 2-point mount and drop-weight mechanism with a ratcheted gripper, suitable for tennis, squash, or badminton rackets.
Both machines are portable and priced in the low hundreds of dollars (roughly the $200 to $300 range), which makes them good for club players learning to string. If you plan to string more often or want extra stability, look at a machine with a 6-point mounting system, which secures the frame at more points. The Tourna 300-CS, for example, is a step-up crank (lockout) machine with 6-point mounting and higher build quality, at a higher price.
At the high end, brands like Tecnifibre offer professional-grade electronic (constant-pull) machines used in pro tournaments, which provide speed and precision but are more than most beginners need. The aim is to choose a machine that fits your budget and stringing volume:
- 1 to 2 racquets a month: a basic drop-weight (Gamma, Klippermate) is fine.
- Higher volume: a more advanced machine with fixed clamps or a crank tensioner may be justified.
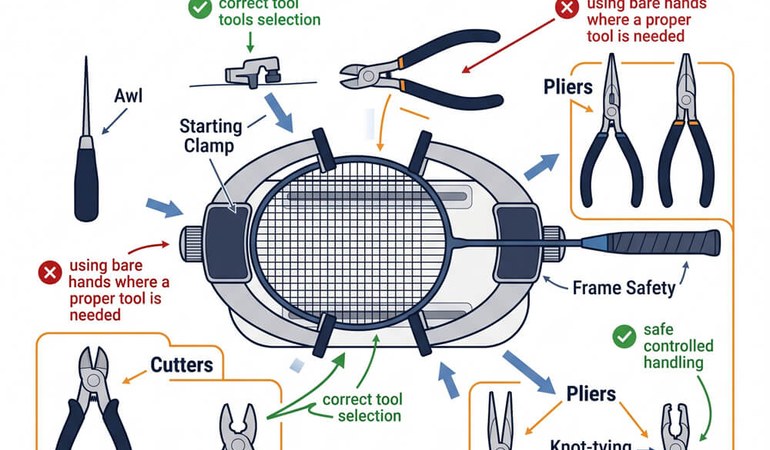
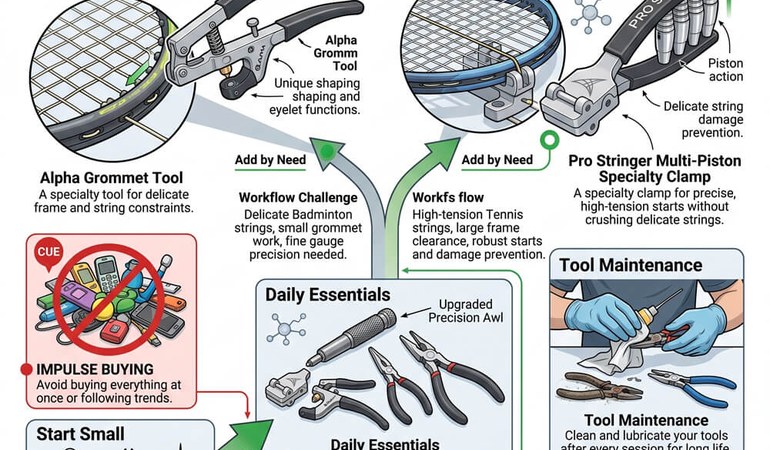
Clamps
Clamps hold the string in place at tension. There are two types: floating (flying) clamps that come with drop-weight machines, and fixed clamps built into higher-end machines.
Floating clamps are moveable two-prong clamps that pinch two strings and hold tension. The Gamma X-2 includes two composite flying clamps, and the Klippermate comes with a pair of steel flying clamps. These work fine for squash stringing; just adjust them so they are tight enough to hold the string without slipping, but not so tight that they crush or nick the string.
Fixed clamps are mounted on glide rails or turntable tracks and can be quicker to use and more precise, but they usually come on more expensive machines.
In either case, a starting clamp is also very useful. A starting clamp is a separate, spring-loaded clamp (sold by Gamma, Tourna, and others) that you use to grab a string beyond the frame, for instance to help start your first main string or to hold tension when tying off a knot. Many experienced stringers treat a starting clamp as a near-essential tool for any stringing job.
If you do not have a dedicated starting clamp, some machines provide alternatives; the Klippermate includes a start pin for anchoring the first main. For entry-level picks, the Tourna or Gamma starting clamp are both widely used for their reliability, and on a tight budget the clamp included with your machine can double as a starting clamp in a pinch.
Make sure you also have a pair of pliers, typically needle-nose pliers with built-in cutters, to help pull knots tight and grab strings in tight spots. Pliers are often included in stringer tool kits or with machines; the Klippermate, for example, comes with a stringer's pliers in the box.
String Cutters
A good cutter is needed for trimming strings, both removing old strings and cutting excess ends after knots. You want a sharp diagonal cutter or flush cutter that can slice through thick multifilament squash strings cleanly.
Many stringers simply use a small pair of electrician's diagonal pliers. There are also branded options like the Gamma diagonal cutter or the Tourna strap cutter designed for strings, and Tecnifibre and other brands sometimes include a cutter in their tool kits. The main thing is sharpness; a dedicated string cutter makes it easy to snip strings without fraying.
When removing old strings, do not cut all the strings at once in one spot. Instead, cut a few strings at a time, ideally starting in the middle of the string bed and working outward in an X or alternating pattern to release tension evenly, which prevents sudden stress on one side of the frame. A quality cutter lets you do this quickly. Invest in a decent pair of cutting pliers, often under $15, or use the one provided with many stringing kits.
Awl
A stringing awl is a small pointed tool used to help maneuver strings through tight or blocked grommet holes. In squash racquets you may encounter shared holes or tough angle passes, especially with fan-pattern stringing, where an awl becomes handy.
You can use it to gently widen a grommet or to push a string aside to make room for another. For example, if a cross string hole is partially blocked by a main string, inserting the awl can create a temporary pathway. Brands like Gamma, Tourna, or Pro Stringer sell awls with ergonomic handles, and even a basic one will do the job.
Use the awl carefully: never force it too hard, since you could damage the grommet or puncture the string, and never lever it against the frame. It should slide in smoothly alongside the string.
The awl is also useful for straightening strings or unpicking a knot if you make a mistake. Many beginner kits include an awl; the Klippermate, for instance, provides a stringer's awl with its machine. If yours did not come with one, a standalone awl is inexpensive and worth having in your toolbox.
Tension Calibrator
To make sure your machine is pulling accurately, a tension calibrator is helpful. This device lets you check and adjust the pulling tension of your stringing machine over time. Drop-weight machines are inherently accurate when used properly, but calibration is still useful, and it is essential to check crank or electronic machines periodically.
A common calibrator looks like a small scale with a spring mechanism. You clamp it in your machine like a racquet string and pull tension to see if the machine's reading matches the calibrator's reading. The Gamma Tension Calibrator is a popular choice, a spring-based calibrator that works on any stringing machine and measures up to 90 lbs of tension, well above the squash range.
Using it is simple: set your machine to a known tension (say 25 lbs), attach the calibrator, and if the calibrator does not read 25, you know your machine needs adjustment or has some error. Entry-level machines usually hold tension well, but it is good practice to test them occasionally.
If you do not have a dedicated tool, a handheld luggage scale or fish scale can serve as a rough calibrator, but the purpose-made devices by Gamma or Tourna are more straightforward. Keeping your machine calibrated means that when you dial in 26 lbs, you are truly getting 26 lbs on your squash strings, which is important for consistency in how the racquet plays.
With these tools, a reliable stringing machine, proper clamps, a cutter, an awl, and a calibrator, you are equipped to restring a squash racquet. Most starter stringing machines come with at least basic versions of these tools, but upgrading to higher-quality accessories can make the job easier as you gain experience.
Step-by-Step Guide: How to Restring a Squash Racquet
Restringing a squash racquet involves a series of precise steps. Below is a step-by-step guide for beginners and club-level players, walking through the whole process from removing the old string to finishing the final knot, focused on squash racquets.
Before you begin, make sure you have your tools ready (as listed above) and plenty of string. A squash racket typically needs around 9 to 10 meters of string, or about 30 to 33 feet.
1. Prepare the Frame (Remove Old Strings)
Begin by taking out the old strings carefully. Use your string cutter to cut the old strings and relieve tension gradually. The best practice is to cut a few mains and crosses in the center of the racket, then continue cutting outwards in a star or X pattern. This evens out the tension release and prevents the frame from warping.
Never cut all the strings at once or only on one side, since the sudden imbalance could damage the racquet. Once the strings are all limp, pull them out of the grommets and discard them.
Take a moment to inspect the frame and grommets: make sure there are no cracks in the frame, and check that none of the plastic grommet holes are split or missing. If you see a cracked grommet that could cut into a new string, you might use a tiny piece of tubing or a new grommet insert, but that is an advanced fix; for now, just note any badly damaged grommets.
Wipe the inside of the frame with a cloth to clear any debris, since bits of broken string or dirt sometimes accumulate. Now your racquet is clean and ready for restringing.
2. Mount the Racquet on the Machine
Proper mounting is crucial for a good string job. Place the racquet on your stringing machine's mounting system. If you have a 2-point mount, common on drop-weight machines like the Gamma X-2 or Klippermate, the racquet is secured at the head and throat. Adjust the posts so they snugly fit the inner hoop of the racquet at 12 o'clock (top) and 6 o'clock (bottom).
Tighten the mounting posts until the frame is secure; it should not wobble, but do not overtighten to the point of distorting the head shape. If you have side supports (6-point mount), gently bring them to touch the sides of the frame and tighten just enough to hold the frame in shape. The goal is for the racquet to be firmly held, as if suspended in the machine, keeping its natural shape.
Double-check that the machine's supports are not pressing on any racquet decals or structural weak points, though they are usually designed to contact solid parts of the frame. A well-mounted squash racquet handles the pulling forces without shifting.
Take your time with mounting, since rushing here leads to mistakes later. Once mounted, position the racquet so you can access the string holes easily, usually oriented with the head at top.
3. Plan the Stringing Pattern and Measure Strings
Before threading any string, know your stringing pattern. Squash racquets vary; common patterns are 14x18, 16x17, and similar, sometimes with fan-shaped string beds. Check the racquet's throat or the manufacturer's guide for the pattern, including where to start mains and whether any holes are skipped.
Most squash racquets use two-piece stringing (separate lengths for mains and crosses), though some can be strung one-piece. As a beginner it is usually simpler to do two-piece. This means you string all the main (vertical) strings with one piece of string, tie them off, then string all the cross (horizontal) strings with another piece.
Measure out your string for the mains and crosses. If you have a packet of 10 m string, you can roughly halve it. For a 14x18 pattern, for example, you might use about 5 m for mains and 4 m for crosses, leaving a bit extra for tying knots.
When in doubt, give yourself a little more length than needed; an extra half meter is better than coming up short on the final crosses. If you are pulling from a reel, measure the lengths or use arm-spans to estimate (one arm-span is roughly 1 yard or meter, depending on your reach). Cut the string cleanly with your cutter. Now orient your two pieces: mains piece and crosses piece.
4. String the Main Strings
Find the two center main holes at the top of the frame. Squash racquets usually have an even number of mains, so there is a symmetrical center. Begin by threading one end of the mains string through the center grommet at the head, down to the corresponding grommet at the throat, so that an equal length of string comes out each side of the frame (one end for left mains, one for right mains).
If your machine has only flying clamps and no starting clamp, you may need to secure one side's string so you can tension the other. One method: install a flying clamp on the two center mains after pulling them snug by hand, or use a starting clamp outside the frame to hold the tail of one main. On a drop weight, you can also use the provided start pin, inserted into an adjacent empty grommet, wedging the string against it.
Now pull tension on the first main string. For example, clamp one end and pull the other with your tensioner to your desired tension (say 26 lbs). With a drop weight, this means wrapping the string in the gripper and lowering the weight bar until the bar comes to horizontal. Once tensioned, clamp that main string near the frame using a flying clamp, or engage the fixed clamp if your machine has one.
Then switch to the other center main: tension it to the same poundage and clamp it off. From here, proceed one main at a time on each side, alternating sides to keep the stress even. Tension the second main on the first side, clamp it, then do the second main on the other side, clamp it, and so on. This alternate side-to-side pattern prevents pulling the frame lopsided.
Continue until all main strings are installed. In squash, mains usually finish at the head or throat depending on the racquet; you know you are done with mains when you have strung the last main on each side and there are no more main grommets open.
Now tie off the mains: identify the designated tie-off hole (usually a slightly larger grommet) as per your racquet pattern. Using one of the loose ends, tie a proper finishing knot (the common choice is a double half-hitch knot or a pro knot). To tie a double half-hitch, loop the string tail twice around the last main and through the loop to create two locking loops, then pull it tight.
Use pliers to gently snug the knot firmly against the frame; it should cinch down on the outside of the grommet. Repeat for the other side's main string. Trim the excess string, leaving about 3 to 4 mm of tail, just in case the knot slips a tiny bit, so you do not want to cut flush. The mains are now complete, secured, and tied off.
5. String the Cross Strings
Take your second piece of string for the crosses. Most squash rackets' cross strings start either at the top of the frame or at the bottom, depending on the design. Typically, if the number of mains is even, you start the crosses at the opposite end from where the mains were tied off. For example, if your mains finished at the head, you start crosses at the throat, or vice versa; check the pattern given by the manufacturer. For this guide, assume you start at the top (head).
Anchor the cross string by tying a starting knot or using a starting clamp. A starting knot is a bulky knot (like a double half-hitch with an extra loop) that will not pull through the grommet; tie it onto the first cross string's hole if it is a dedicated tie-off hole. Alternatively, you can use a starting clamp on the outside of the frame to hold the string after you tension the first cross.
Now weave the cross string over and under the main strings, across the hoop. Weaving means going alternately above one main, below the next, and so on. If the racquet has an even number of mains, each cross starts on the opposite weave to the previous one, so you get an alternating pattern of over and under from one cross to the next.
Pull the cross string all the way through gently by hand to the opposite side; avoid yanking it quickly, because friction on the mains can heat up and burn the string. It helps to pull crosses in a slow, smooth motion, and even in two stages (halfway, then the rest) to reduce friction.
Once the first cross is threaded, insert it into the gripper and pull tension to your desired lbs. Clamp it off against an adjacent main, or if you have two flying clamps you might clamp it to the second cross once that is installed (if using a starting clamp, that holds one end while you clamp the tensioned part with a machine clamp).
Proceed to the next cross string and repeat: weave it through (taking care to do the opposite pattern of the cross above it, so where the previous cross went over a particular main, this one goes under, and vice versa), pull tension, and clamp. Work your way down the racquet one cross at a time.
Use your free hand or an awl to nudge strings into proper alignment if a grommet is crowded. In squash racquets, some crosses may share holes with mains, called shared grommets, which can be tricky; you might need to push the main aside with the awl to get the cross through. Do this carefully to avoid chipping the string's coating.
As you continue, the string bed fills up and it can become slightly harder to weave near the last few crosses, but stick with the over-under pattern. Make sure each cross is pulled tight to the correct tension before moving to the next; missing tension on a cross can seriously drop the playability.
Finally you reach the last cross. Sometimes the last cross needs to go through a hard-to-reach grommet or tie-off hole, and again the awl can assist if needed. Once the final cross is in and tensioned, it is time to tie off.
6. Tie the Knots (Finishing Up)
Locate the proper tie-off grommet for the last cross. The racquet pattern will specify it, but it is often one of the larger holes near where your string ends. Using the loose tail of the cross string, tie a secure knot to lock it in place.
The double half-hitch is the standard: wrap the tail around the adjacent string or frame and loop it twice through itself, then pull tight. Use your pliers to pull the knot snug, but pull firmly without pulling so hard that you snap the string. Tie it tight with the pliers, but you do not need to wrench it; yanking too forcefully can break the string at the knot.
Once the knot is cinched, release any starting clamp (if you used one at the top) and tie that end off as well (if you began with a starting knot, it is already secure). In a two-piece job you have four knots total: two for the mains, two for the crosses.
Make sure all are tight and neatly nestled against the frame outside the grommets. Trim the excess string tails, again leaving a short stub (about 3 mm) beyond each knot. The stringing is now technically complete.
7. Final Tension Check and Unmounting
With the stringing done, do a quick check. Gently tap the strings; you should hear a consistent ping across the string bed. You can also deflect a couple of mains and crosses with your finger, and they should feel appropriately firm, not overly loose like a trampoline.
If you have a smartphone app or frequency method to measure string bed stiffness, you can use it now to see if it is in your expected range. If something seems very off, for example one of the center mains is obviously looser, it might indicate a slipped clamp or missed tension, but if you followed each step this is unlikely.
Now loosen the mounting clamps and supports carefully and remove the racquet from the machine. The frame should retain its normal shape; inspect that there are no cracks, since stringing at correct tension will not crack a good frame, but it is always good to double-check.
As a last step you can straighten the strings, since during weaving a few mains or crosses might be slightly bent. Use your fingers or a string straightener tool to align them so the grid is neat and each intersection is roughly 90 degrees. This helps the string bed play in evenly as you start hitting. You now have a freshly strung squash racquet.
Throughout the process, take your time. Stringing can feel fiddly at first, but with practice you develop a rhythm. Always double-check the pattern, since it is easy to accidentally skip a hole or mis-weave a cross when you are new. If you realize you made a mistake, for example a missed weave or the wrong hole, do not panic. You can often backtrack a couple of strings, or in the worst case pull the string out and redo that section. It is all part of learning.
Tips to Avoid Common Mistakes
Even seasoned stringers were once beginners and made plenty of mistakes. Here are some practical tips to help you avoid common errors.
- Plan the pattern: One of the most frequent first-timer mistakes is starting in the wrong place, such as beginning the mains at the wrong end (head versus throat) or misidentifying the first cross hole. Always verify the correct holes for starting mains and crosses before you start stringing. Many squash racquets have the pattern printed on the frame or come with a stringing guide. If not, manufacturer websites or string forums can provide the pattern. Count the grommets if needed to be sure which are shared or skipped.
- Avoid mis-weaves: A mis-weave is when a cross goes over when it should go under (or vice versa), resulting in two adjacent crosses weaving the same way. To avoid it, always look at the previous cross: your next cross should be the opposite pattern. Taking an extra second to inspect your weave before pulling tension can save you from having to redo it. If you finish stringing and notice a mis-woven cross, the only fix is to redo that cross, so prevention is key. Go slow on weaving until you build speed with experience.
- Clamp care: Releasing the wrong clamp or forgetting to set a clamp is another classic error. Always engage a clamp before you remove tension on a string. For example, never unclamp a tensioned main until the next main is pulled and clamped, otherwise the tension is lost. Develop a habit: after you drop the weight or pull tension, immediately clamp, then you can raise the weight or move to the next string. Also check your clamp tightness; if too loose, strings slip and lose tension, and if too tight they can damage the string. You can test clamp adjustment on a scrap piece of string: it should indent the string slightly but not crush it, and it should not allow the string to slide at all under tension.
- Be gentle with the gear: Avoid kinking or twisting the string sharply, since this can weaken it and lead to premature breakage. When pulling string through grommets or around corners, feed it smoothly. If you hit a snag in a grommet, do not yank; use the awl to clear the path. Similarly, when using a drop weight, do not push the bar down with your hand to force it level; if it is past horizontal, lift and re-pull more string rather than cheating the tension. Forcing the weight can over-tension and stretch the string, or it can indicate you did not pull enough slack. Let gravity do the work for drop weights. For crank or electronic users, be mindful of consistent pulling speed to avoid shocks to the string.
- Measure twice, cut once: It is frustrating to be on the last cross and run out of string because you cut a piece too short. To avoid this, always err on the side of a little extra length when measuring your strings. After a few string jobs you get a sense of exactly how much a particular racquet needs. One tip: keep notes for each racquet you string (pattern, how much string used, tension, and so on). If you do mis-measure and end up short, you might have to tie in a bridge or start over, so give yourself a buffer until you are confident. As a reference, most squash rackets need around 9 to 10 meters total; you might allocate about 5 m for mains and 4 m for crosses, but adjust based on frame size and string thickness.
- Knot tying: When tying off, make sure your knots are secure. A common mistake is not pulling knots tight enough, which can loosen later, or conversely pulling too hard and snapping the string at the knot. Use pliers to tug knots snug, but as mentioned do not overdo it. Also make sure you are tying the knot around the correct anchor string, usually the last main or last cross adjacent to the tie-off hole. A mis-tied knot that does not cinch against the frame will not hold tension. If you are unsure how to tie a good finishing knot, there are plenty of video demonstrations; practice a few on an old piece of string.
- Cross tension maintenance: In squash, as in tennis, when you weave crosses the friction can cause slight tension loss by the time you pull it all the way through. To reduce this, some stringers pre-weave the next cross while tensioning the current one, or straighten the current cross while under tension to lower friction. As a beginner, a simpler approach is to pull each cross a little slower and maybe add a pound of tension to crosses (some do +2 lbs on crosses for squash, though it is optional). The main point is to be consistent with each cross and not rush the weaving process to avoid friction heat.
- Final inspection: After stringing, always give the racket a once-over before you or someone else plays with it. Check that you did not skip any crosses or mains. It is surprisingly easy to miss a bottom cross string; some squash rackets have an empty hole if you do not string the last cross, which is a telltale sign something is off. Also verify all outer mains are properly finished and not accidentally left tensionless. If the pattern calls for a cross tie-off on a main string, make sure you did tie there. Look at the string bed for any obvious mis-weave or an abnormal gap. Catching a mistake now means you can fix it, even if it means redoing part of the job, rather than playing with a flawed string job.
By being mindful of these pitfalls, you increase your success rate with each restring. Patience and practice are key; your first few string jobs will take time, perhaps an hour or more, but as you become comfortable with the techniques you get faster and more confident.
When to Consider Professional Restringing
While learning to string your own racquets is rewarding and cost-saving in the long run, there are situations where you might opt for a professional stringer instead.
- Lack of time or patience: Stringing requires a chunk of uninterrupted time and concentration. If you find it too tedious or you are short on time (for example, a tournament next day and your string just broke), going to a pro shop can be a smart choice. Professionals can usually turn around a restring quickly and efficiently.
- Complex racquet patterns: Some squash racquets have unconventional string patterns, for example fan-shaped patterns or models that allow both fan and conventional patterns. These can be tricky for a beginner. If you are unsure how to handle a particular racquet's pattern or features (like teardrop frames with no bridge), a professional stringer has the experience to do it correctly. They also have access to pattern databases for virtually every racquet.
- No access to equipment: If you are a very occasional player who breaks strings rarely, investing in a machine might not be cost-effective. In that case, paying a professional when needed is simpler. Also, if you are traveling or away from your machine and pop a string, you will need a pro's help.
- Consistency and precision: Professional stringers, especially certified ones, have refined techniques to ensure consistency. If you have tried stringing a few times but are not confident the result is as good as a pro job, you might prefer to leave your main playing racquet to the pros, at least until your skills improve. There is no shame in recognizing a limit; even club players who can string might choose a pro for an important restring, like just before a big match, to ensure good results.
- Racquet repairs: If your racquet needs extras like new grommet strips, a bumper guard replacement, or has a crack that needs assessing, these are things a professional can handle during a restring. They can install a new grommet kit and make sure everything is correct. As a beginner, dealing with broken grommets or clamping around a crack is delicate, so that is a good time to trust a pro.
Professional restringing is a convenient fallback. They have the high-end machines and expertise to deal with any situation. By learning to string yourself, using the tools and techniques outlined above, you gain independence and can experiment with strings and tensions freely. Many squash players find it satisfying to string their own racquets, since it builds a deeper understanding of your equipment and can save money over time.
Blending DIY with pro help: You do not have to choose one or the other exclusively. Some players string their everyday practice racquets themselves, but for tournament play they get a pro job to be sure of tension accuracy. Others handle simple jobs and leave the tricky ones (like a racket with a broken bumper that needs replacing) to a shop. Use your judgment. The point is that you now understand what goes into a string job, and the next time you hit a perfect length or nick shot, you can credit both your skill and that well-tuned string bed.
By following this guide, beginners and club players should feel ready to take on squash racquet restringing. We covered why keeping your strings fresh matters for performance and control, listed the must-have tools (with reliable brands like Gamma, Tourna, Klippermate, and Tecnifibre offering good options), and walked step by step through a squash restring. With practice you will improve your technique and speed. Stay organized, be patient with yourself, and enjoy the process. There is a real satisfaction in winning a rally with a racquet you strung on your own.